Particle System Tutorial
Introduction
In the following pages, you will find a brief overview of the process for creating particle effects. For this example, we'll be creating a basic steam-jet effect. This document assumes a working knowledge of World Edit, as well as a thorough reading of the information on the Particle Editor page, and we will be using the map we created from the Advanced Environment Construction Tutorial.
Initial Setup
The workflow for editing particles in idTech 5 is different from other engines. With idTech 5, you will be doing all of your editing within the actual game itself, rather than an external editor. This allows for a fantastic level of interactivity. Once you get set up, there is literally no distinction between playing the game and editing particles. There's a tremendous freedom in being able to play while you edit and get instant feedback.
Open the Advanced Environment Construction Tutorial map we previously built.
The first thing you need to do is create a new particle system, so open the particle editor. Depending on your settings, it will either be in the tabs to the right of idStudio, or in the menu in World Edit. Open the World Edit tab and go to idStudio > Tool Windows > Particle Editor
The particle editor window will open. Drag the window out and make it as large as you can. The ideal setup would be to have a second monitor with the particle editor maximized, so you can see the game in full screen while you work. Choose File > New from the menu on the particle editor. You will be prompted to specify a name for the new particle system. This name is a pseudo-path used for organization, just like all other decls in the idTech 5 engine. You should follow the standard naming system that is established for the project. For this example, we'll call it test/steam_test.
After choosing OK, you'll be prompted to choose a particle file that will contain the new asset. In general, try to keep the files organized as well. We'll put this example as steamtest.prt.
You should now be presented with a default stage node in the node view:
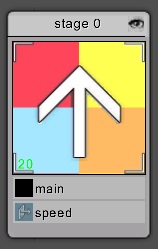
Now that it exists, we need to place it somewhere in the world so we can start editing it in context to the environment. Open World Edit and find a location in the map. This document assumes basic knowledge of World Edit so basic navigation won't be covered here.
Once you have found an appropriate spot, add a new func_emitter entity by right clicking the 2D view and choosing New Entity > func > emitter.
You can use the rotate and move tools to place it correctly in the spot. For this example, we'll have some steam jetting out of the side of one of the pumps. The white arrow indicates the particle's Z axis.
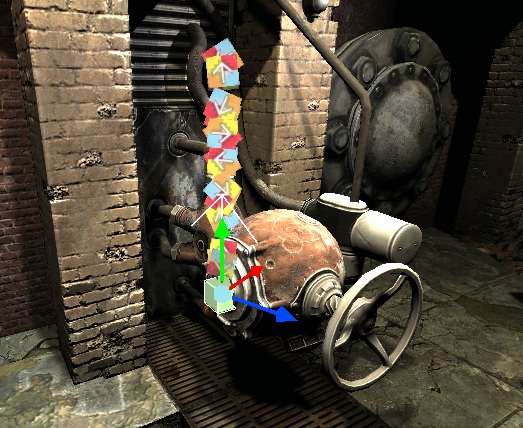
This is what a new particle system looks like in it default state. Obviously not quite a steam jet.
Now that it's generally in place, go to the Entity Inspector and change the particleDecl to use our newly created example, test/steam_test.
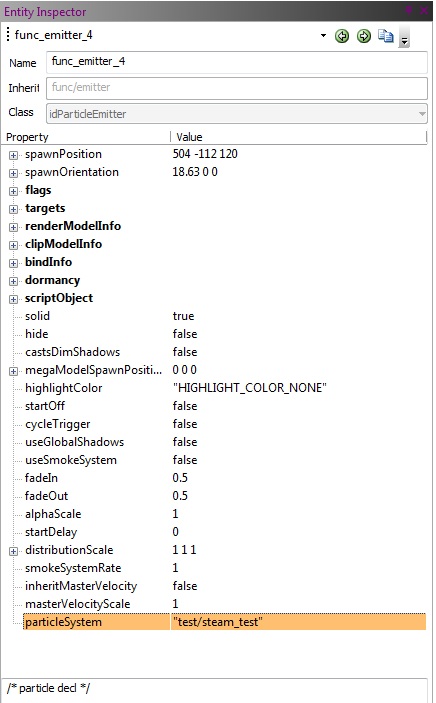
Save the map, and you're now done in World Edit.
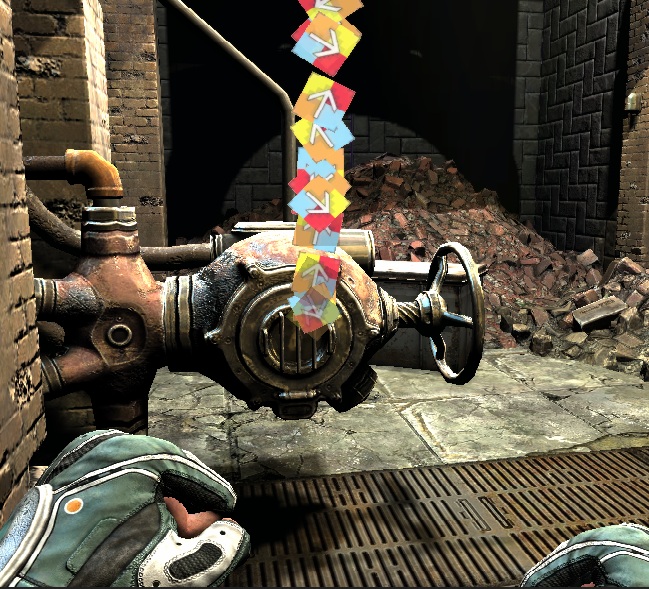
Open the Engine view, load your map, and find the location of your particle system. You should see something like this:
Working in the Particle Editor
Now that everything is set up and we can see the particle system in game, it's time to start working in the particle editor. Below is a brief overview of a particle stage in the editor.
|
Title Bar |
Allows you to change the stage name and set the stage's inherited parent stage |
|
Hide/Show |
Toggles visibility of the stage |
|
Material Preview |
A preview of the stage's material. If the stages uses animated textures, they will preview here as well. |
|
Property List |
All the properties used by the stage. |
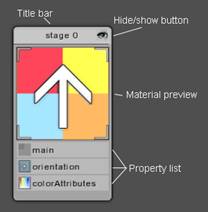
For the remainder of the article, we will run through the setup of all the properties to get the desired look. This particle system will have two stages. The first stage is a long streak-like steam burst to convey the high-pressure, and the second stage is a more general round puff to fill out the effect. It's a good idea to always name your stages something that makes sense and is descriptive.
Adding Properties
A stage's default settings are quite basic. To add more functionality, you add properties to the property list.
The first thing we need to do is rename the stage to "streaks". Click on the node where it says stage 0, and under stage properties, set the stageName to 'streaks'
Now we need to make sure the default total particles is set to 20. Click the Main button on the stage node. Make sure that "Total Particles" is set to 20.
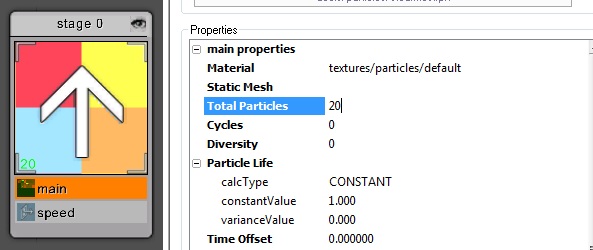
Now we'll change the distribution. To add a distribution property to the property list, right-click anywhere on the stage and choose Add Property > Distribution.
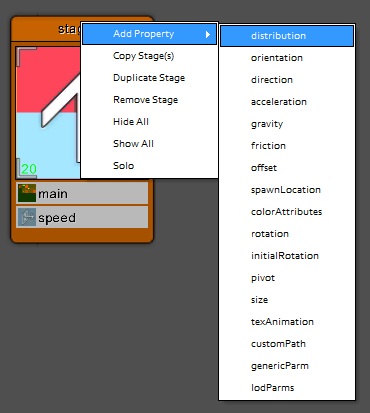
The distribution property defines the volume from which particles are spawned. The particle calcType is set to constant so we just need to change the constantValue on XYZ to 0.
Now to add some variation. Go to the main property and find the particleLife value. Change the calctype to MINMAX.Set the min and max values to 0.25 and 0.5.
Now to modify the Speed property. Click on speed on the node, and set the speed.z calcType to PARAMETRIC_INTEGRATE if its not already. Set the from and to values to 1. Since we are going to use velocity-aligned particles for the streaks, we need to give them a small velocity in the direction we want to orient them. For this effect, we'll add the actual motion with an acceleration property.
Add an acceleration property. X and Y can remain as 0, but we'll change the Z parameter. Set calcType to PARAMETRIC_EVAL, fromValue to 300 and toValue to 100. Set the varianceValue to 0.550.
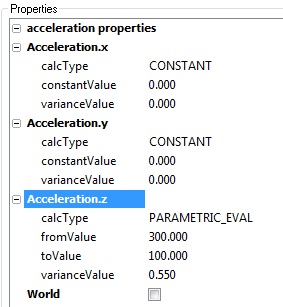
This will cause it to move fast initially and slow down as the particle ages.
Looking at rainbow-colored squares is a bit distracting, so we'll set up the proper materials. Go to the main property and change the material to textures/particles/smoke/smokepuff02
This material is an animated texture, so you'll need to add a texAnimation property. Use the type SINGLE_CYCLE_RATE. This will play the animation once over the lifetime, using a specified rate for the animation.
Since there are 16 frames in the animation, set numColumns to 16. For the rate parameter, set it to a constant 24. This means it will play 24 frames of animation over the life of the particle. Since there are only 16 frames, the animation will play fast, then hold the last frame until the particle dies.
Now to make it a bit closer to the streaky look it should have. Add an orientation property. change the type to AIMED. Initially you'll see the particles disappear. That is because the segmentLength is 0, which you should now change to 20.
Sometimes it can be difficult to read exactly where the
particles are spawning from, so for that, you can toggle visualization
of the particle stage distribution volumes. In the particle editor,
click the "Show Dist Vol" button in the toolbar: 
Add a Size property. For most particles, only the size.x matters, since you are using square quad. Only in some cases, such as static mesh particles, will you need to use all three size components.
Change the size.x calcType to PARAMETRIC_EVAL and the from/to values to 2 and 30.
The aspectRatio property is used to adjust the relationship between width and height in a standard quad particle. With the AIMED orientation type the aspect is considered a scale of the segmentLength. Set this to PARAMETRIC_EVAL with 2.0-1.0. This will cause the quad to start out long, and get shorter over their life.
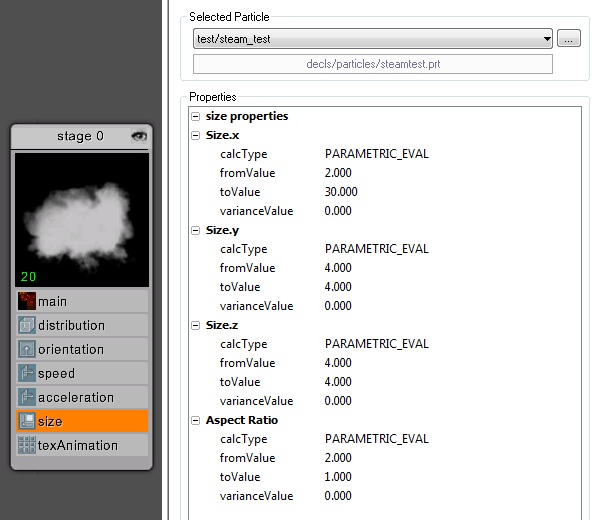
You'll see the particles are starting a bit to high up from the origin. Rather than move the emitter, let's add an offset property. Change the offset.z to use a constant -10
The particles are a bit opaque, we are going to need to add a colorAttributes property, and edit the following:
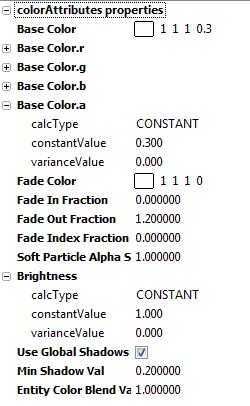
Set the fade color to 1,1,1,0 which will fade it to white with zero alpha.
Stage Two
Now you should be ready for the second stage. Right click the "Streaks" stage and choose Duplicate Stage. Rename the new stage "Puffs".
This stage will remain mostly the same, with a few key changes.
First change the totalParticles to 10, (under main) and the orientation type to VIEW.
In the speed property, change the speed.z calcType to CURVE_SCALE_BIAS. We'll use a fast-in curve to move the particles quickly to their final position so there's a sense of force and resistence. For the curve parameter, choose the curve "expin" in the media browser, and set the scaleValue to 100.
Let's also change the acceleration. The fast curve speed is now taking care of outward motion, so we'll set the acceleration.z to CONSTANT 0. Change the acceleration.y to a MINMAX of -30 to 30, This will give the puffs a little bit of spread as they come outward.
You can now remove the offset property from this stage. Right click, and select remove property.
In the colorAttributes property, change the baseColor.a to a MINMAX of 0.3 to 0.4
And finally, change the size.x calcType to CURVE_SCALE_BIAS, using the same "expin" curve from before. Use scale/bias values of 20 and 5. This will cause the particles to start at 5 units and very quickly ramp to 20 units in size, which along with the speed value, gives a nice since of swift motion and resistence.
And that's pretty much it! Feel free to play around with the settings to get familiar with all of the possibilities.
