
Introduction
This section of the tutorials is aimed at the basics of lighting an environment you create within the toolset. The tools allow the user to approach any environment a variety of different ways, even allowing you to combine different methods, in order to get the intended result.
Point Lights
Point Lights, at their core, are the basic lights you’ll be using to light your environments.
Placing a Point Light
We previously showed you how to place a Point Light into the
Basic Environment built in section 4.1 of the Basic Environment
Construction tutorial:
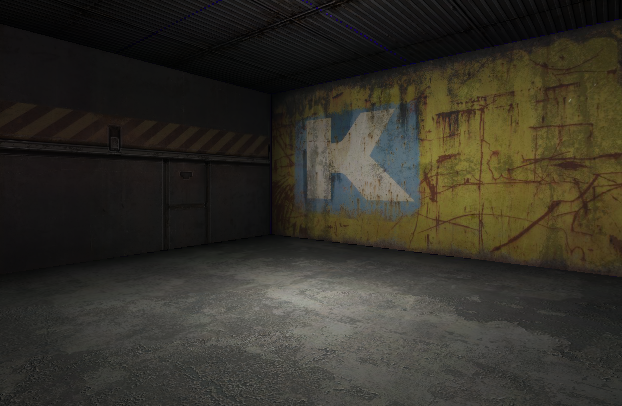
Right-Clicking in the 2D Camera View allows you to select from a list of entities to place. Do this and select New Light. Position the new Light entity in the center of the room. Now, in the 3D World Camera view, press “F3” to render real-time. You should see your light working like this:
Here are some general shortcuts and tips for adjusting lights:
- While selected, pressing “J” allows you to change the properties of a light in the Light Inspector.
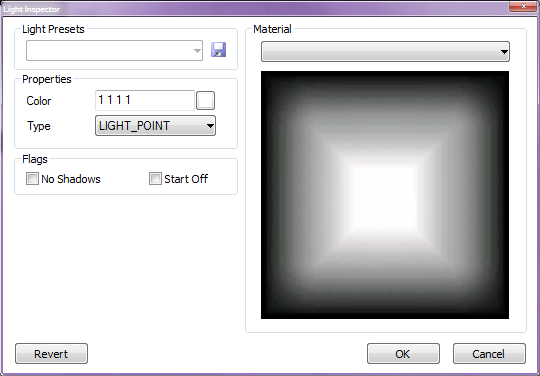
- While selected, pressing “K” allows you to change the color and brightness values of a light in the Color Picker.
- To resize lights similar to resizing brushes, open up idStudio Preferences by selecting Edit-> Preferences from the Main Menu in the World Editor. Check the option "Side Select Lights" under the Views/Rendering section at the top of the preferences window.
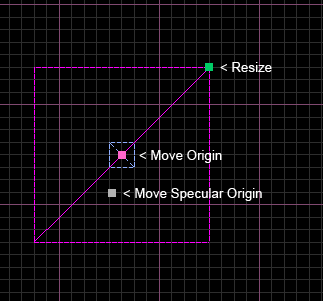
- Moving the small pink dot on a light moves its origin.
- Moving the small white dot changes the specular origin.
Spot Lights
Spot Lights project in one direction similar to a flash light, unlike Point Lights.
Placing a Spot Light
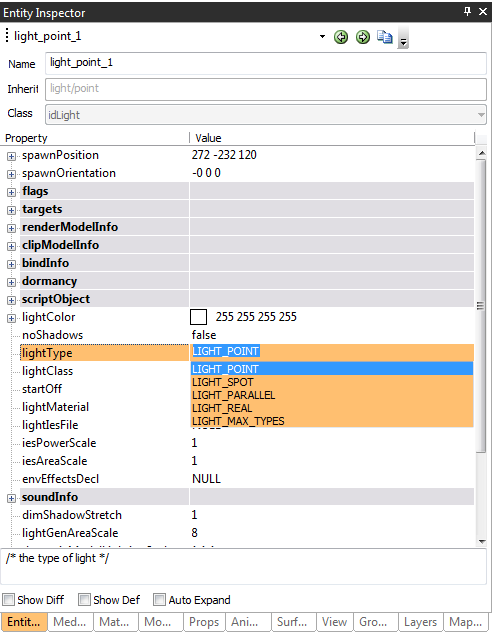
Right-Click in the 2D Camera View and select New Light. This is the exact same process we used to place a point light only now we need to change the lightType in order to make this light a Spot Light. With your light selected click on the Entity Inspector tab (or press N) to bring up the currently selected lights properties.
In the property window in the Entity Inspector, browse to lightType and click on LIGHT_POINT to extend the menu to reveal the available light types and select LIGHT_SPOT.
Your light should look like a small purple triangle in the 2D Camera View:
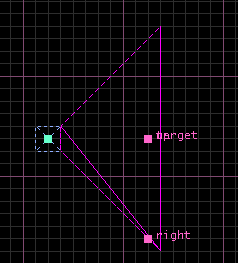
Adjusting the size and direction of the spot light is very similar to how you adjusted the size of our previously placed point light. You have 3 different pink dots to manipulate with Target being the direction of the light, Up allowing you to extend the cone up and down, and Right allowing you to extend left or right.
Parallel Lights
Parallel lights are used mainly as a sunlight source for outdoor environments or interior spaces that are intended to be lit by outside sources, such as windows or holes in the ceilings. The light entity itself looks and acts exactly like a point light and is manipulated the same way.
Placing a Parallel Light
Right-Click in the 2D Camera View and select New Light. With the light selected, click on the Entity Inspector tab to bring up its properties. In the property window browse to lightType and click on LIGHT_POINT to extend the menu to reveal the available light types and select LIGHT_PARALLEL.
You can manipulate the source of the Parallel Light exactly the same as the other light sources you’ve placed prior to this by simply moving the pink dot in the desired direction.
Blended Lights
Blended lights are mainly used to add environmental effects such as blinking lights.
Placing a Blended Light
Right-Click in the 2D Camera View and select New Light. With the light selected, click on the Entity Inspector tab to bring up its properties. In the property window browse to lightClass and click on LIGHT_NORMAL to extend the menu to reveal the available light types and select LIGHT_BLENDED_ONLY.
Once the Blended Light is placed, you can see that the icon has changed to set itself apart from other light entities. You can change your light projection by simply hitting “J” and choosing the projection you’d like from the available list. A few things to keep in mind when browsing projections :
Projections with “filter” in the name subtract light from the environment
Projections with “modulate” in the name add light to the environment.
Prelights vs. Normal Lights
When placing lights throughout your environment you want to keep in mind that the default lightClass set in your lights properties is LIGHT_NORMAL. What this means is that your currently selected light will affect the world geometry as well as dynamic models and characters.
It’s a safe bet that by the end of your lighting pass on a level you’ll have hundreds of lights scattered around and it’s generally not the best idea to have all of them affecting everything in the environment. By selecting the lightClass and changing all of your lights to LIGHT_PRELIGHT_ONLY it will guarantee that your lights are only affecting the world geometry.
It’s best to allow yourself to make a separate pass on your environment for dynamic-only lighting.
Render Preview
The Render Preview window has a number of buttons and features but for this tutorial we’ll only focus on a few shortcuts.
F3 will render your current camera view.
F7 will refresh your current camera view.
F6 will enable material animations, mainly used to see blended light flickers and pulses.
Radiosity
Lighting with Radiosity allows your environments to have a more realistic effect on your environment by adding in light bounces resulting in a softer looking world.
Setting up a Radiosity Lit Environment
To start the radiosity bake you’ll just need to click on Build in the menu and then click on Build Wizard.
Click on the advanced tab in the Map Build Wizard window. Your map will already be highlighted in the Select Map section of the Build Wizard. Set the Build Preset to Full Map Build + Mega Bake.
We’ll also want to make sure the Build Megatextures Locally option is checked.
The final step will be to click the Edit BuildCVars button located at the top right of the window. A dialogue box will pop up informing you that the current map doesn’t have a buildcvar file set up and that it will be creating a new one using the default values. Click Ok.
This is the Build Cvar property window that exposes all of the options available to you for baking your map. Use Radiosity is automatically checked and our Radiosity Scale by default is 8. Go ahead and hit Save and click Build back in the build wizard to start building the map using the default radiosity settings.
Radiosity Tips
You may notice some slight corruption or blotchiness to the darker areas of the map after initially baking with radiosity. Even though radiosity is a great asset when lighting your environment it generally can’t handle everything on its own and you may still need to use a few fill lights to get your intended result.
Using the same example map as before lets add a point light to the environment and bring it’s brightness down to try and match our intended result. This may take some trial and error but after a few attempts and tweaks with the brightness levels you’ll start seeing results.