GtkRadiant Editor Manual
The entities in Quake III Arena are limited to those
defined by the game code. The editor can draws entity information
from the game code, or from special definition (.def) files.
Version 192 of the editor comes with a .def file developed from an
original supplied by EutecTic. Mods made to Quake III Arena
can add to and/or subtract from the entities used by a game. If you
plan to work on mods, you should create multiple project files
(copy and rename your project file) with the changes required for
the mod.
You make game design decisions about entities and modify their
features within the Entity Window. The definition file that you
select on the Project Settings… window determines what
entities will be shown in the Entity List and what, if any,
property descriptions appear in the Key Descriptions and Check box
Spawn Flags.
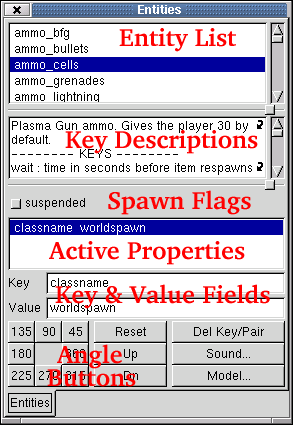
Entity List
The Entity List is the field on the Entity Window. It
contains the "classnames" of all the entities defined by the
definition file in alphabetical order.
You can use the scroll bar to scroll through the entities or,
after clicking on the field, type in the first letter of the class
you want to use (e.g.; type in "T" to select "target", or "A" for
ammo, "W" for weapon).
Double-click on the classname to select it and enter it on the
first line of the Active Properties field.
The Entities appendices of this document contain a complete listing of all the entities used in Quake III Arena.
Key Descriptions
The entries in the Key Description field are the "rules of use"
for the hi-lighted classname in the Entity List field. You can use
the scroll bar to scroll up and down through the lines, but
the entries are not interactive. If you are using the .def file
accompanying release version 192 of the editor (or Eutectic's
original), all the key commands are described and their acceptable
values (or value ranges) are listed. If you are using the
descriptions in the .c game code file, they may be substantially
less descriptive.
Check box Spawn Flags
Spawn flags are properties assigned to entities by use of check
boxes. Check the box to set the feature for the selected entity.
Many entities have only a single spawn flag property, while others
have numerous ones. Note that the check boxes to the right are only
relevant for Quake 2 single player games and will not work for Quake III Arena.
Active Properties
This field shows all the properties currently assigned to the
selected (or newly-created) entity. Each property has two parts:
key and value. Once created or assigned, they appear on the same
line together. Only properties that are valid for an entity (that
is, ones that appear in the Key Descriptions field) will function
in game. Adding others may create error messages. You cannot
directly affect the properties in this field.
Clicking on an active property hi-lights it and fills in the key
and value fields below. You can edit both the key and the
value in those fields, or use the Del Key/Pair button to delete it
altogether.
Key & Value Fields
Keys (and their values) are assigned to entities by typing them
into the fields. There is no spell check or auto-correction, so
make sure that your typing is accurate. Start by typing in
the name of the key. Then hit TAB or ENTER to change to the value
field. This also clears the contents of the value field. Now type
in the value for the key (the Key Descriptions list the acceptable
value ranges for the keys). If you hit ENTER, the key and value
appear in the Active Properties field. If you hit TAB, the
cursor moves up to the key field. You can also click directly on a
field to edit it. The cursor will appear after the last character
in the field. Use arrow keys to position the cursor within the
field.
Angle Buttons
The Angle Buttons (below the value field) are used to assign a
facing direction (as is the case with player start spots or
misc_models) or movement direction to entities (such as doors and
buttons). Click on a button to create an Angle key with that
button's value in the Active Properties field. Clicking on
another key changes the angle value.
There are two clusters of angle buttons. The first cluster
represents rotation around the Z-axis for entities like player
start or spawn spots or misc_models. The entity will face in the
selected direction. The buttons represent angle directions in
45 degree increments. There is a direct correspondance between the
angle that the entity will face (or move) and the position of the
button in the cluster. If you select the 90-degree button at the
top center of the cluster, the entity will face "up" on the XY 2D
Map. If you select the 180-degree button on the left side of
the cluster, the entity will face left on the XY 2D Map.
For entities like doors or buttons, it represents the direction
that entity will move when activated.
The second angle button cluster assigns an up (-1) or down
(-2) direction to the entity. Note that an entity can only have one
facing direction. It cannot face up and 45 degrees. It can only
affect one or the other.
It is also possible to directly edit the angle value in the
value field. This allows for a much more precise angle
selection.
The Other Buttons
A third cluster of buttons sits to the right of the Angle
buttons. Each has a unique function.
Reset
Clicking on this button will reset all properties from the entity to the default values.
Del Key/Pair
If you have selected an active property, clicking on this button
will delete the property.
Sound…
This opens a Windows directory browser in the directory that
contains the map sounds. Double clicking on a sound file name
in the browser window creates an active property with the
appropriate key and the value as the path/name for that sound.
Model…
This opens a Windows directory browser in the models/mapobjects
directory. Double clicking on an .md3 file name in the
browser window creates classname misc_model active property with
the value as the path/name for that model.
These tools manipulate the in game entities. The map component
handling tools that are described in the Working with Brushes
section also work with entities.
Escape (ESC)
This is the all-purpose deselect key. Use it to back out of
operations you don't want to complete or to stop working on an
entity.
Connect Entities
This targets one entity, typically an activating trigger, at
another entity, usually a target of some kind. Some entities
may be linked in multi-part chains, where each entity has some
effect on the one(s) that follow it. To use, do the following:
- Hi-light the acting entity (usually a trigger, or a button).
- Hi-light the targeted entity (examples: target_position,
target_relay, a door).
- Select Connect Entities (or press CTRL + k).
- A path is drawn between the two entities. The first entity
selected always targets on the second.
Troubleshooting: If the connection is not made check the
following:
- Are both objects already entities? Sometimes it's easy to forget
to make a trigger brush into a trigger.
- Did you select ONLY two objects? If you accidentally click
on something you don't intend to link, you have to start the
linkage over.
- Did you select the objects in the correct order?
- Is the second object something that can be triggered
remotely?
Ungroup Entity
(Menu: Selection > Ungroup Entity)
(Shortcut: none)
This unbinds an entity made of brushes, and/or patches, and md2
models back into separate map components. Once ungrouped, the
entity is no longer an entity and loses any and all key value
properties it may have had.
Design Note: If you intend to rebuild an entity after
ungrouping it, write down its key properties and values first.
Moving Selected Entity
These keys move the Entity around the map in discrete map grid
increments.
Move Selection Down
Each press moves the selected map component down along the
Z-axis by one grid position (at current grid setting). Not affected
by current 2D-map view.
Move Selection Up
Each press moves the selected map component up along the Z-axis
by one grid position (at current grid setting). Not affected by
current 2D-map view.
Nudging the Entity
These keys move the Entity around the map in discrete map grid
increments. The movement is in terms of the selected window, not in
terms of XYZ coordinates.
Nudge Down
Each press moves the selected map component "down" the map view
by one grid position (at the current grid setting). The movement is
relative to the selected map view, not XYZ coordinates.
Nudge Up
Each press moves the selected map component "up" the map view by
one grid position (at the current grid setting). The movement is
relative to the selected map view, not XYZ coordinates.
Nudge Left
Each press moves the selected map component "left" the map view
by one grid position (at the current grid setting). The movement is
relative to the selected map view, not XYZ coordinates.
Nudge Right
Each press moves the selected map component "right" the map view
by one grid position (at the current grid setting). The movement is
relative to the selected map view, not XYZ coordinates.
Changing Facing
To change the direction that a misc_model or entity with a
facing (such as a player start or spawn spot) faces, use Angle keys
and values. You should "rotate" (change facing) entities with
either the Angle buttons on the Entity Window or by entering an
Angle key and giving it a rotation value between 1 and 360
(inclusive).
Back | Home | Next