GtkRadiant Editor Manual
The next set of commands comes from the Curve Menu. Some are
duplicated on the Patch Tool Bar.
Cylinder
This creates the simplest cylinder. Cylinders are always drawn
with their open ends facing up and down. It does not matter which
map view is open when the cylinder is created.
More Cylinders:
Dense Cylinder
This is a cylinder with a set of extra rows. It allows a
180-degree bend into a half donut (half torus).
Very Dense Cylinder
This is a cylinder with two extra sets of rows. This allows a
bend into a full donut (torus).
Square Cylinder
This is a cylinder whose columns have been adjusted so that a
square, with flat sides, is formed.
End Cap
This is a half cylinder.
Bevel
This is a quarter cylinder
More End caps, Bevels:
Square Endcap
This is an endcap without the backside removed.
Square Bevel
This is a bevel with squared off back faces
Cone
A cone is a cylinder with control points drawn together and
welded at one end to form a point.
Design Note: A curve patch sphere can be constructed from
a cone. Start with a cubic brush. Convert into a cone. Go into edit
vertexes mode and grab the control point at the peak of the
cone. Pull it downward to half the height of the cone. Clone
the resulting piece and flip it upside down.
Simple Patch Mesh…
The patch mesh is the basic building block use to create all
curves. All the curve primitives are deformations of this
item. For this to work, you must first create a brush of the
dimension desired for the patch. Selecting this opens a Patch
dialogue window. This lets you select the vertical (rows) and
horizontal (columns) complexity of the patch. The more complexity
means being able to perform more deformations on the patch. It also
means adding a greater number of triangles that must be
rendered.
Insert
Adding control points increases the complexity of a mesh. This
action does not increase the physical size of a mesh. Additions are
usually done before manipulating the patch mesh.
Insert (2) Columns
This adds two columns of control points to the left edge of a
patch.
Add (2) Columns
This adds two columns of control points to the right edge of a
patch.
Insert (2) Rows
This adds two rows of control points to the lower edge of a
patch.
Add (2) Rows
This adds two rows of control points to the upper edge of a
patch.
Delete
Deleting control points reduces the complexity of a patch mesh.
Be warned that the features created by the removed points are also
removed. It does not make the mesh a less complex version of the
former design. Deletions also change the dimensions of the mesh,
removing the area created by the deleted control points. A mesh
cannot be reduced smaller than a 3 column by 3 row complexity.
First (2) Columns
This removes two columns of control points from the left edge of
a patch.
Last (2) Columns
This removes two columns of control points from the right edge
of a patch.
First (2) Rows
This removes two rows of control points from the lower edge of a
patch.
Last (2) Rows
This removes two rows of control points from the upper edge of a
patch.
Matrix
This has nothing to do with Neo and Trinity. It's the patch mesh
taken as a whole.
Invert
This command inverts the normals of the patch mesh. The normals
control the direction of facing for the texture skin and the
clipping surfaces.
Re-disperse
This is used on a selected patch. When rows or columns are
inserted or added to a patch, the dimensions of the patch are not
changed. The distances between the new additions and the old points
are not the same. This command averages out the distance between
the points. It does not change the size of the patch.
WARNING! Only apply this BEFORE adjusting the patch. Otherwise,
you may lose your work on it. With some patches, selecting this
command will destroy the patch itself.
Cols
The distance between columns is averaged and evened out.
Rows
The distance between rows is averaged and evened out.
Transpose
(Function undetermined)
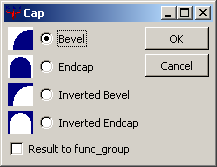
Cap
This command adds "cap" patches to the ends of the patch. The
original brush and the caps are linked together as a func_group
entity. A Patch Tool Bar button duplicates this command. The type
of cap depends on the selected patch:
 |
Cylinder |
The ends of the cylinder are sealed with circular patches. |
| Square
Cylinder |
The ends of the cylinder are sealed with square patches. |
|
Cone |
Both ends are capped (open and point). You will want to discard the
cap on the point end. |
|
Bevel |
If you select to cap a bevel, a dialogue window pops up.
A normal bevel cap covers the space between the curve and the
center. |
| Inverted
Bevel |
An inverted bevel covers the space between the curve and the outer
corner. |
|
Endcap |
If you select to cap an endcap, the same dialogue window pops
up. |
| Patch
Mesh |
The bevel/endcap window will pop up. Results will vary depending on
the manipulations done to the mesh. |
| Square
Bevel |
Capped in the same manner as a cylinder |
| Square End Cap |
Capped
in the same manner as a cylinder |
Cycle Cap Texture
Press this repeatedly until the texture on the cap patch looks
correct.
Redisperse Patch Points
This is used on a selected patch. When rows or columns are
inserted or added to a patch, the dimensions of the whole patch are
not automatically adjusted. The distances between the new additions
and the old points are not the same. This command averages out the
distance between the points.
WARNING: Only apply this BEFORE making adjustments to the
patch, otherwise you may lose your work on it. With some
patches, the patch itself will be destroyed.
CAP (put caps on the current patch)
This is used on a selected patch.
Design Notes:
Endcaps: Don't cap endcaps with this tool. Make a
pair of opposing bevel caps that match the arch of the endcap
Messed Up Texturing: If an inverted bevel endcap covers
something other than an arc of a perfect circle, it is likely that
the texture won't appear right when you apply the CAP function to
the texture. Press SHIFT + CTRL + P a few times until it looks
right.
Weld Equal Patch Points (welds equal patch points during
moves)
(Patch Control Bar only) This feature, when selected (button
pressed in) causes control points to weld together if they are
moved to the same coordinates. Undo will undo the move and the
weld.
Drill Down (selects drill down rows and columns)
When this is toggled on (depressed), clicking on a control point
in a 2D Map view selects all the control points in the row or
column beneath it.
Moving Selected Curve Patch
These keys move the curve patch around the map in discrete map
grid increments.
Move Selection Down
Each press moves the selected map component down along the
Z-axis by one grid position (at current grid setting). Not affected
by current 2D-map view.
Move Selection Up
Each press moves the selected map component up along the Z-axis
by one grid position (at current grid setting). Not affected by
current 2D-map view.
Nudging the Curve Patch
These keys move the curve patch around the map in discrete map
grid increments. The movement is in terms of the selected window,
not in terms of XYZ coordinates.
Nudge Down
Each press moves the selected map component "down" the map view
by one grid position (at the current grid setting). The movement is
relative to the selected map view, not XYZ coordinates.
Nudge Up
Each press moves the selected map component "up" the map view by
one grid position (at the current grid setting). The movement is
relative to the selected map view, not XYZ coordinates.
Nudge Left
Each press moves the selected map component "left" the map view
by one grid position (at the current grid setting). The movement is
relative to the selected map view, not XYZ coordinates.
Nudge Right
Each press moves the selected map component "right" the map view
by one grid position (at the current grid setting). The movement is
relative to the selected map view, not XYZ coordinates.
Snap Selection To Grid
If you are using the map grid to keep curve patches in
alignment, this is a great tool. Rotated curve patches and curve
patches that have had their vertices tweaked can have vertices that
no longer lie on map grid intersections. This snaps the vertices to
align with the grid. Be warned that snapping to large grids
may be hazardous to the health of your curve patch (Snap and it's
gone! But that's what UNDO is for).
Back | Home | Next